Are you looking for a secure and durable fencing solution? Palisade fencing is an excellent choice, offering both protection and aesthetic appeal. Known for its strength, it deters intruders while enhancing the appearance of your property. In this post, we’ll guide you through the step-by-step process of installing a palisade fence. From planning to finishing touches, you'll learn everything you need for a successful installation.
What is a Palisade Fence?
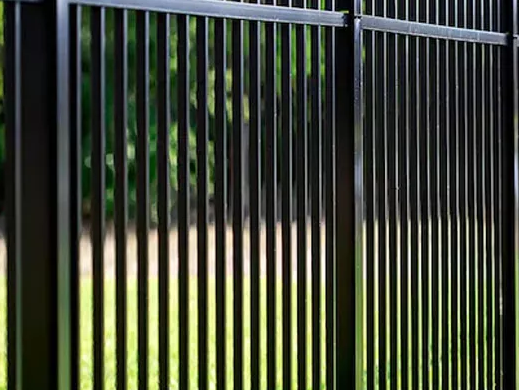
A palisade fence is a type of vertical security fence. It’s built using metal posts and sharp, pointed vertical pales. These pales are typically made of steel or aluminum, providing both strength and durability.
Key Features of a Palisade Fence
Vertical Spikes: The pointed tops of the pales serve as a deterrent to intruders, making it difficult to climb.
Materials Used: Steel and aluminum are the most common materials. Steel offers more durability, while aluminum is lighter and resistant to rust.
Security: The design is specifically meant to prevent unauthorized access to high-risk areas, offering excellent protection. Palisade fences are not only practical but also provide a sleek, modern look, making them suitable for both security and aesthetic purposes. Whether for commercial or residential use, they are built to withstand harsh conditions, ensuring long-lasting durability.
Types of Palisade Fences
1. Standard Palisade Fencing
This is the most common type. It features vertical, evenly spaced steel or aluminum pales. Standard palisade fencing is ideal for industrial and commercial properties where security is a priority. It provides strong protection and is often used around warehouses, factories, and construction sites.
2. Security Palisade Fencing
Security palisade fences have additional features like razor wire or barbed wire at the top. These are used in high-security areas, such as prisons, military bases, or power stations. The enhanced security features make it nearly impossible for intruders to climb or cut through.
3. Decorative Palisade Fencing
Decorative palisade fencing combines both security and aesthetic appeal. The design is more refined, making it suitable for residential properties or areas where appearance matters, such as gardens or estates. This type of fence blends protection with a stylish look.
4. Timber Palisade Fencing
Timber palisade fencing offers a rustic and natural look. The wooden pales are used instead of metal, which can be more fitting for rural or residential settings. While it offers good security, timber fencing is not as durable as its metal counterparts and may require more maintenance.
Tools and Materials You’ll Need to Install a Palisade Fence
Essential Tools for Installation
Before you begin, make sure you have these tools on hand:
Tape Measure: For measuring distances and ensuring proper spacing between posts.
Spirit Level: To keep posts and rails straight and upright during installation.
Battery Drill: For drilling holes and driving screws into the posts and rails.
Cement: For setting posts securely in the ground.
Post-Hole Spade: If you don’t have a post-hole digger, this tool is great for digging deep holes.
Materials Needed
Here’s a list of materials you’ll need:
Palisade Panels: These are the vertical pieces that form the fence.
Posts: Strong supports to hold the panels in place.
Rails: Horizontal bars that connect the posts.
Bolts and Nuts: For securing the panels to the posts and rails.
Concrete: To stabilize the posts and ensure a solid foundation.
Safety Gear Recommendations
Working with heavy materials can be risky. Don’t forget to wear:
Additional Tip
Ensure you have the right anti-vandal fixings and bolts for added security. These special fasteners make it harder for intruders to tamper with your fence.
Step-by-Step Guide to Installing a Palisade Fence
Step 1: Planning and Preparing the Area
The first step is essential for a successful installation.
Measuring the Ground: Use a tape measure to determine the exact length of your fence. Mark the fence line clearly using a string line and pegs. This will help you visualize the layout and keep the posts aligned.
Preparing the Ground: Clear the area of any debris, rocks, or obstacles. Make sure the ground is level so your posts will stand straight and the fence will be sturdy. You might need to dig out some areas to ensure the fence line is even.
Checking Local Regulations: Before you start, check any local zoning or building regulations. Some areas require permits for fence installation, especially in residential or commercial zones. Make sure you have everything in order to avoid any legal issues.
Step 2: Installing the Fence Posts
Now that your area is prepared, it's time to install the fence posts.
Digging the Post Holes: Start by digging holes for the posts. Each hole should be about 600mm deep and 350mm x 350mm wide. This ensures the posts are stable once set in concrete. Use a post-hole digger or spade to create clean, straight holes.
Setting the Posts in Concrete: Place each post in its respective hole. Fill the hole with concrete to hold the post securely. Make sure the concrete fills all around the post for maximum stability. Let the concrete set for at least 24 hours before proceeding.
Using a Spirit Level: As you set each post, use a spirit level to check that it’s perfectly vertical. This step is crucial for the fence to stand straight and even.
Ensuring Proper Spacing: Ensure the posts are spaced according to the palisade panel width. The distance between each post should match the length of your panels, ensuring a snug fit for the entire fence.
Additional Tip: To avoid instability, make sure each post is 600mm deep and around 350mm x 350mm wide. This depth and width will provide the strength needed to hold the posts firmly in place.
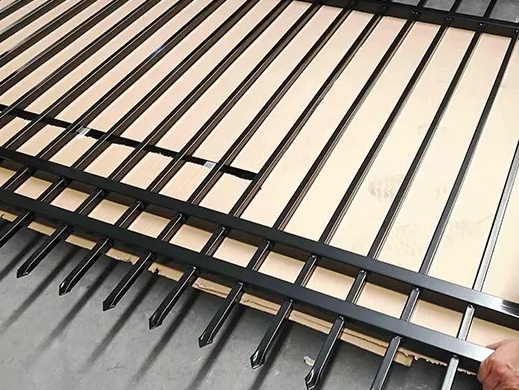
Step 3: Attaching the Rails
Once the posts are set, it's time to install the horizontal rails.
Attaching Horizontal Rails to the Posts: Start by placing the rails horizontally between the posts. These rails will support the palisade panels. Ensure the rails fit snugly and are aligned properly.
Using Link Plates for Internal and External Corners: If your fence includes corners, use link plates to connect the posts at both internal and external angles. These plates help secure the rails in place and maintain a strong connection between posts.
Securing the Rails with Bolts: Use bolts to attach the rails securely to the posts. Make sure each bolt is tightened well so the rails don’t shift. This provides stability and ensures the fence remains sturdy.
Additional Tip: For added security, consider using M12 bolts to attach the rails. These larger bolts are stronger and help secure the rails even more effectively, making your fence more resistant to tampering.
Step 4: Installing the Pales
Now, let's add the vertical pales to complete the fence.
Attaching Vertical Pales to the Rails: Place the pales vertically between the rails. The pales should fit securely into the spaces provided by the rails. Use bolts to attach each pale to the rails, ensuring they are firmly in place.
Ensuring Proper Spacing and Alignment: It's important to maintain even spacing between each pale. Use a spacer or measure the gaps to ensure consistency. Proper alignment will make your fence look neat and professional.
Using Anti-Vandal Fixings for Added Security: To prevent tampering, use anti-vandal fixings. These bolts are designed to make it harder for anyone to remove or adjust the pales, adding an extra layer of security to your fence.
Installing Any Additional Security Features: If needed, add extra security features like razor wire at the top of the fence. This step is optional but recommended for high-security areas. Razor wire further deters intruders and makes climbing even more difficult.
Additional Tip: Bolt the pales onto the rails using M8 bolts and pre-drilled holes. This ensures uniformity in the installation and prevents any misalignment during the process.
Step 5: Final Adjustments and Finishing Touches
Once the palisade panels are installed, it’s time to ensure everything is secure and polished.
Tightening All Bolts and Ensuring Security: Go through the entire fence and check each bolt. Tighten any loose bolts to make sure everything is firmly in place. This step is important for maintaining the strength and security of your fence.
Checking Alignment and Even Spacing of the Pales: Take a moment to inspect the alignment of the pales. Ensure they are straight and evenly spaced. Use a spirit level if needed to check vertical alignment.
Applying Touch-Up Paint: Check for any exposed metal, especially around areas where cuts were made. Apply touch-up paint to protect the metal from rust. This will help your fence last longer and keep it looking fresh. Once these final steps are completed, your palisade fence will be ready to stand strong and secure for years to come.
Tips for Ensuring a Secure and Durable Palisade Fence
Importance of Using High-Quality Materials
To ensure your fence lasts, choose high-quality materials. Opt for corrosion-resistant metals like galvanized steel or aluminum. These materials can withstand weather conditions and prevent rust, increasing the durability of your fence.
The Significance of Allowing Concrete to Cure Properly
For a strong foundation, let the concrete cure properly before continuing with the installation. It's essential to wait at least 24 hours for the concrete to set. This ensures the posts stay firm and don’t shift over time.
Regular Maintenance Tips
Maintaining your fence is key to keeping it strong. Regularly check for loose bolts and tighten them when necessary. Also, clean the fence to prevent dirt and grime buildup. This simple upkeep will help extend the life of your fence.
Security Upgrades
For added security, consider installing anti-climb spikes or additional wiring. Razor wire at the top of the fence can further prevent unauthorized access, especially in high-security areas.
Additional Tip
After installation, give the concrete 24 hours to cure. This step will ensure your posts are firmly set and won’t shift or loosen over time.
Can You Install a Palisade Fence Yourself?
When a DIY Installation is Feasible
Installing a palisade fence can be a great DIY project for small to medium-sized installations. If the ground is clear and level, it’s easier to measure and place posts accurately. If the area isn’t too large and the soil isn’t too tough, you can complete the job on your own or with a helper.
When to Consider Hiring a Professional Installer
For larger projects or areas with complex sites, it's wise to hire a professional. Uneven terrain, dense soil, or difficult access may make installation challenging. A professional installer will have the right equipment and expertise to tackle these problems.
Benefits of Professional Installation
Hiring a professional comes with several advantages:
Proper Technique: They’ll ensure every step is done correctly, from digging post holes to securing the panels.
Faster Installation: Experts can complete the job quicker, saving you time.
Better Security Features: Professionals know how to implement additional security measures, like anti-climb spikes or reinforced bolts, to enhance your fence’s safety.
Common Mistakes to Avoid When Installing a Palisade Fence
Miscalculating Post Placement and Spacing
One of the most common mistakes is incorrectly measuring the distance between posts. If the posts are too far apart or too close, the panels won’t fit properly. Double-check the measurements to ensure everything is spaced evenly.
Skipping Ground Preparation Steps
Failing to prepare the ground can lead to instability. Make sure to clear the area of debris, rocks, and obstacles. Also, level the ground to ensure the posts are aligned and the fence stands strong.
Failing to Check Alignment During Installation
It’s easy to overlook alignment when installing posts. Use a spirit level to make sure each post is vertically straight. This small step ensures your fence looks neat and stays stable over time.
Using Inferior Materials or Inadequate Fixings
Cheap materials or low-quality fixings can weaken your fence. Always opt for high-quality metals like galvanized steel or aluminum, and use strong bolts to secure the panels. This will help your fence last longer and withstand weather conditions.
Additional Tip
Before securing the posts with concrete, always double-check their alignment. Misplaced posts can ruin the entire fence, so take the time to ensure everything is properly positioned.
Conclusion
Installing a palisade fence involves several key steps: planning, setting posts, attaching rails, installing pales, and final adjustments. Palisade fences offer excellent security, durability, and aesthetic appeal. Follow the steps carefully, or consider professional help for the best results.
Frequently Asked Questions (FAQ)
Q: How long does it take to install a palisade fence?
A: The time needed depends on the project size. DIY projects may take a few days, while professionals can complete larger installations faster.
Q: What’s the best material for palisade fencing?
A: Steel offers strength and durability, while aluminum is lighter and corrosion-resistant. Timber provides a more rustic look but is less durable.
Q: Can palisade fences be used in all weather conditions?
A: Yes, palisade fences, especially those made of steel or aluminum, are designed to withstand various weather conditions, including rain and snow.
Q: What’s the cost of installing a palisade fence?
A: Costs vary based on the material and size. DIY is cheaper, but professional installation offers better speed and security.


